《ESP32 進階》ESP32-CAM + INMP441:影音同步串流
用 ESP32-CAM 搭配 INMP441 數位麥克風,實現影音同步串流。教學涵蓋 NodeMCU-32S 與 ESP32-CAM 的腳位衝突解析、I2S_NUM_1 聲道反轉實測,以及完整程式碼。
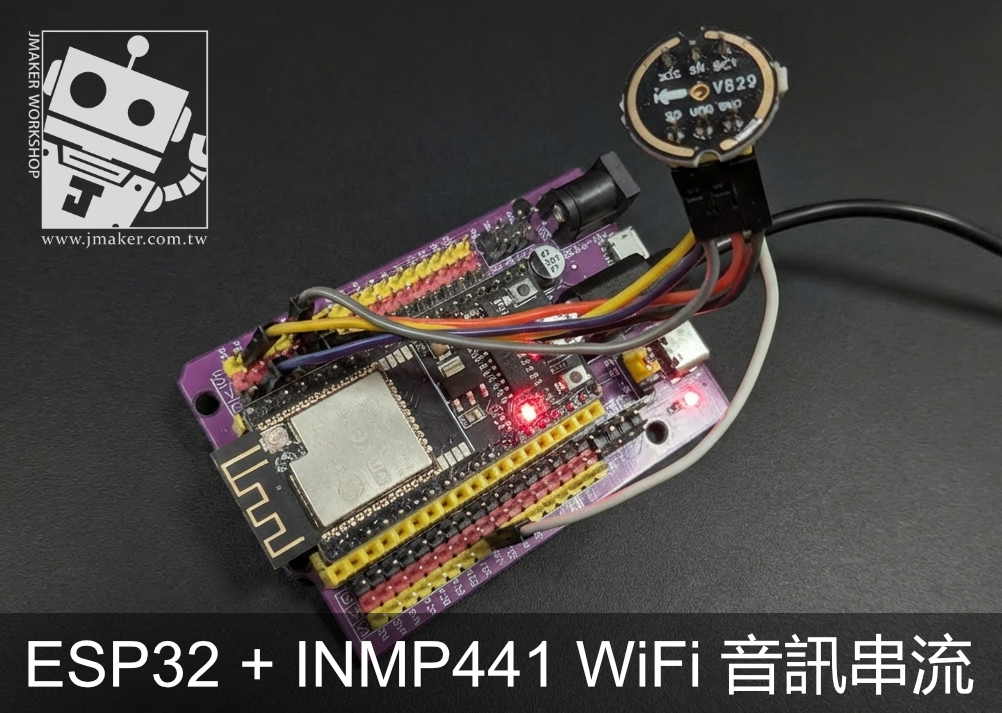
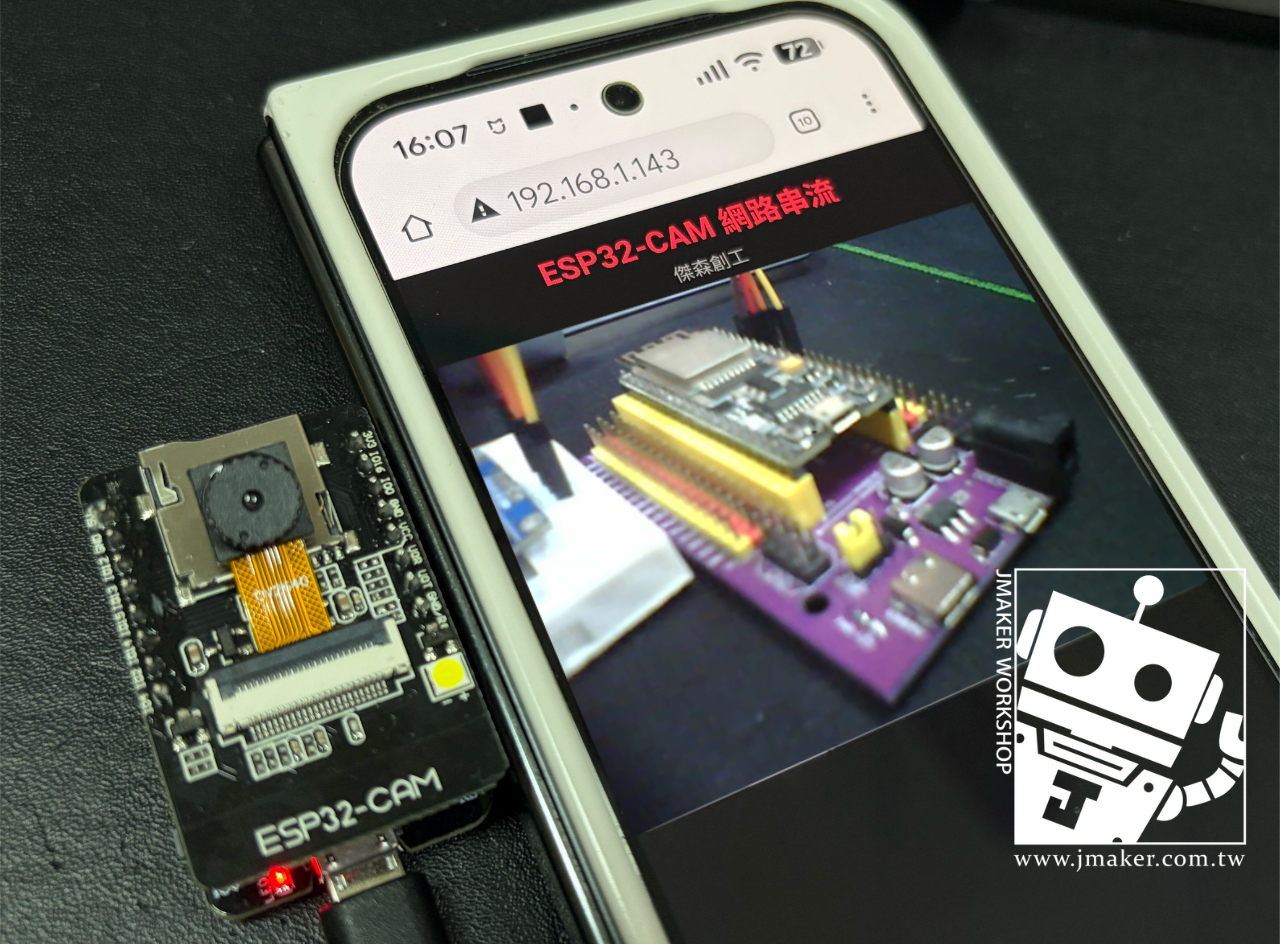
上一篇我們用 NodeMCU-32S 搭配 INMP441 完成了 WiFi 即時音訊串流,這次要把聲音和影像結合在一起!用 ESP32-CAM 搭配 INMP441 數位麥克風,在瀏覽器上同時看到即時畫面、聽到即時聲音。
如果你還沒看過上一篇,建議先去了解 INMP441 和 I2S 的基礎,這篇會直接進入實作。
如果你也還沒用ESP32-CAM這塊板子來做影像串流,那也強烈建議先去看我們之前的教學哦!
從 NodeMCU-32S 換到 ESP32-CAM:腳位衝突問題
上一篇教學中,我們在 NodeMCU-32S 上使用了以下腳位接 INMP441:
| INMP441 | NodeMCU-32S | 功能 |
|---|---|---|
| SCK | GPIO 26 | I2S 時脈 |
| WS | GPIO 22 | I2S 字選擇 |
| SD | GPIO 21 | I2S 資料 |
但如果你直接把這些腳位搬到 ESP32-CAM 上,三個全部都會衝突:
| 腳位 | INMP441 需要 | ESP32-CAM 已佔用 | 衝突! |
|---|---|---|---|
| GPIO 26 | I2S SCK | 攝影機 I2C SDA(SIOD) | ❌ |
| GPIO 22 | I2S WS | 攝影機像素時脈(PCLK) | ❌ |
| GPIO 21 | I2S SD | 攝影機資料線(Y5) | ❌ |
ESP32-CAM(AI-Thinker)的攝影機佔用了非常多的 GPIO,再加上 SD 卡也佔了一批,整塊板子能用的腳位寥寥無幾。
ESP32-CAM 可用的腳位
把攝影機佔用的腳位扣掉後,ESP32-CAM 真正能自由使用的 GPIO 大概只有這些:
| GPIO | 注意事項 |
|---|---|
| GPIO 2 | 也是板載 LED,上傳時不能接高電平 |
| GPIO 4 | 閃光燈 LED,同時也是 SD 卡 D1 |
| GPIO 12 | SD 卡 D2,不用 SD 卡時可用(Strapping pin,注意啟動電壓) |
| GPIO 13 | SD 卡 D3,不用 SD 卡時可用 |
| GPIO 14 | SD 卡 CLK,不用 SD 卡時可用 |
| GPIO 15 | SD 卡 CMD,不用 SD 卡時可用 |
| GPIO 16 | 連接 PSRAM,使用相機時不可用 |
結論很明確:要接 INMP441,就得犧牲 SD 卡功能,把原本給 SD 卡用的腳位拿來接麥克風。
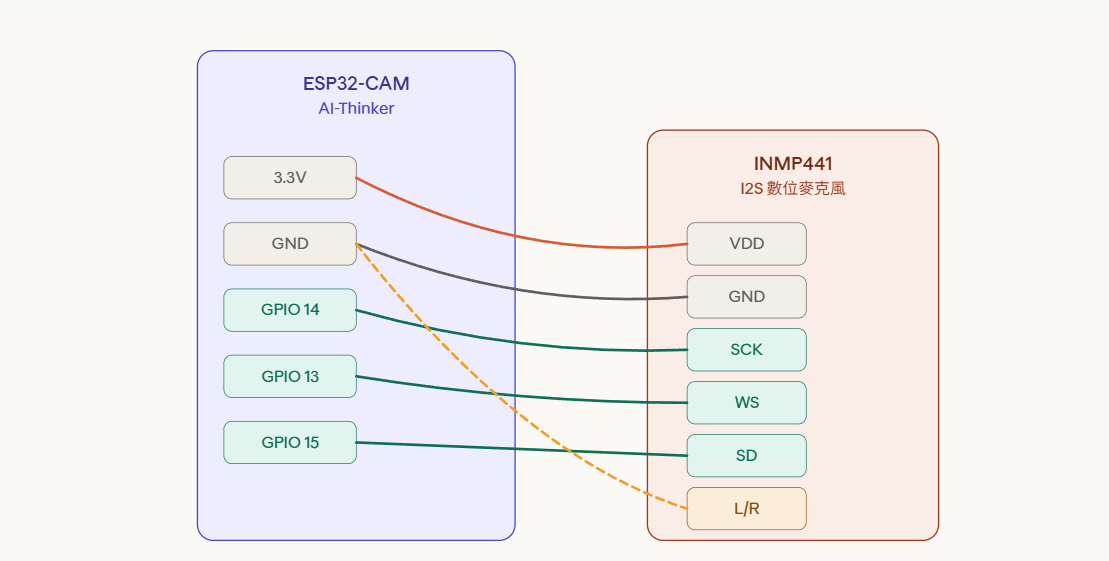
INMP441 在 ESP32-CAM 上的接線
| INMP441 | ESP32-CAM GPIO | 說明 |
|---|---|---|
| VDD | 3.3V | 電源 |
| GND | GND | 接地 |
| SCK | GPIO 14 | I2S 時脈(原 SD 卡 CLK) |
| WS | GPIO 13 | I2S 字選擇(原 SD 卡 D3) |
| SD | GPIO 15 | I2S 資料(原 SD 卡 CMD) |
| L/R | GND | 選擇右聲道 |
⚠️ 重要差異: 因為攝影機已經佔用了 I2S_NUM_0,INMP441 必須使用 I2S_NUM_1(ESP32 的第二組 I2S 通道)。這跟上一篇在 NodeMCU-32S 上用 I2S_NUM_0 是不同的。
💡 為什麼選 GPIO 13、14、15? 這三個腳位原本是 SD 卡使用的,不用 SD 卡時就能釋放出來。我們刻意避開 GPIO 2(板載 LED、Strapping pin,上傳程式容易失敗)和 GPIO 12(Strapping pin,影響 Flash 電壓選擇,可能導致開機失敗),選用問題最少的三個腳位。
接線差異對照表
| 項目 | NodeMCU-32S(上一篇) | ESP32-CAM(本篇) |
|---|---|---|
| I2S SCK | GPIO 26 | GPIO 14 |
| I2S WS | GPIO 22 | GPIO 13 |
| I2S SD | GPIO 21 | GPIO 15 |
| I2S Port | I2S_NUM_0 | I2S_NUM_1 |
| channel_format | ONLY_RIGHT | ONLY_RIGT |
| SD 卡 | 不影響 | 無法使用 |
💡 L/R 接 GND、程式用 ONLY_RIGHT,跟上一篇 NodeMCU-32S 的設定不同。在ESP32-CAM這塊板子,同樣把L/R接到GND,但卻是右聲道輸出,請一定要留意!硬體準備
所需材料
| 材料 | 數量 | 說明 |
|---|---|---|
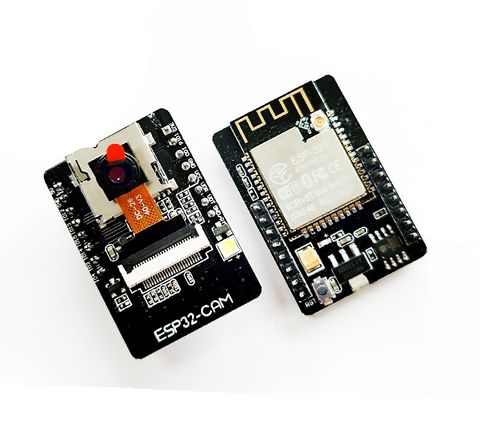
| ESP32-CAM(AI-Thinker) | 1 | 搭載 OV2640 攝影模組 |
| ESP32-CAM 上傳底板 | 1 | 或使用 FTDI USB-TTL 轉接器 |
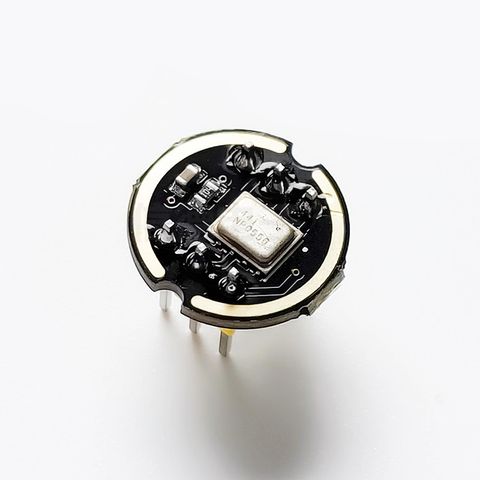
| INMP441 麥克風模組 | 1 | I2S 數位麥克風 |
| 麵包板 | 1 | |
| 杜邦線 | 若干 | |
| Micro USB 傳輸線 | 1 | 供電與燒錄程式 |
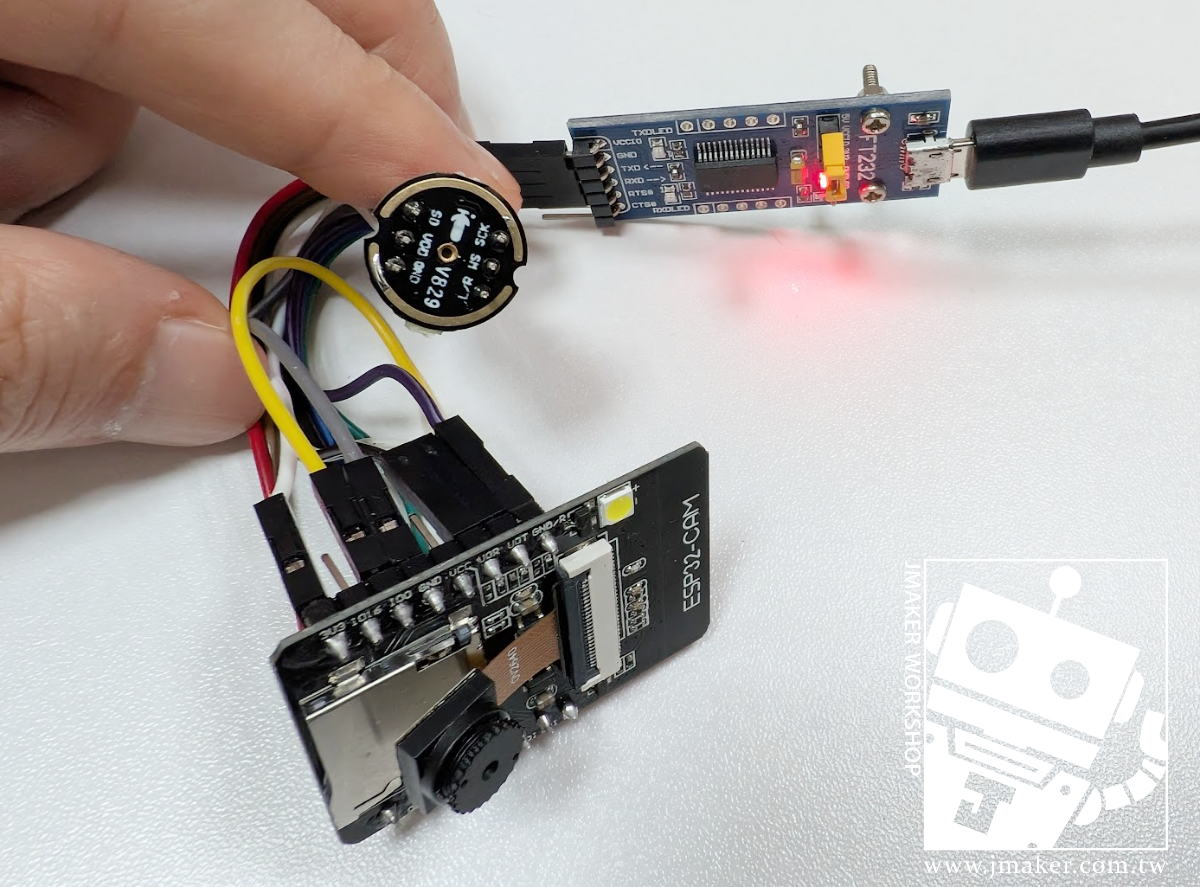
因這次ESP32-CAM除了影像串流,還要接INMP411所以不太適合接底板來上傳,所以就要用TTL模組來上傳了。接線上可能會比較麻煩,大家要多留意。

接線圖
將 INMP441 按照上方的對照表接好。ESP32-CAM 的排針可能需要自己焊,如果你用上傳底板,可以直接從底板上的排針引線出來。
軟體架構
整個系統的運作流程:
OV2640 攝影模組                INMP441 麥克風
    │ (Camera 介面)                │ (I2S 介面)
    ▼                             ▼
         ESP32-CAM(AI-Thinker)
    │                             │
    │ 埠 80:網頁介面              │
    │ 埠 81:MJPEG 影像串流        │
    │ 埠 82:WebSocket 音訊串流    │
    ▼                             ▼
         瀏覽器(手機 / 電腦)
         🎥 影像 + 🔊 聲音
ESP32-CAM 同時運行三個伺服器:
- HTTP 伺服器(埠 80):提供包含影音播放器的網頁
- MJPEG 串流伺服器(埠 81):持續推送攝影機影像
- WebSocket 伺服器(埠 82):即時傳送麥克風音訊
需要安裝的函式庫
在 Arduino IDE 的「管理函式庫」中搜尋並安裝:
| 函式庫名稱 | 作者 | 用途 |
|---|---|---|
| WebSockets | Markus Sattler | WebSocket 伺服器 |
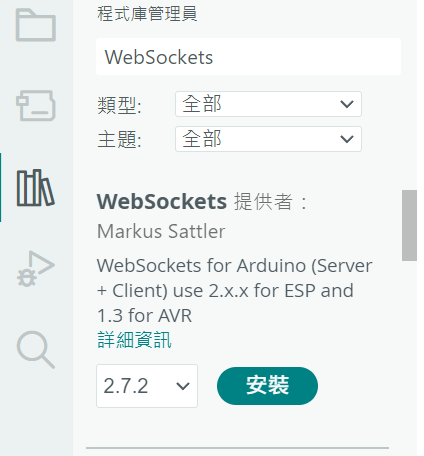
攝影機和 I2S 驅動是 ESP32 內建的,不需要額外安裝。
完整程式碼
#include "esp_camera.h"
#include <WiFi.h>
#include "esp_http_server.h"
#include <WebSocketsServer.h>
#include <driver/i2s.h>
// ========== WiFi 設定 ==========
const char* ssid = "你的WiFi名稱";
const char* password = "你的WiFi密碼";
// ========== AI-Thinker ESP32-CAM 攝影機腳位(固定的,不用改)==========
#define PWDN_GPIO_NUM 32
#define RESET_GPIO_NUM -1
#define XCLK_GPIO_NUM 0
#define SIOD_GPIO_NUM 26
#define SIOC_GPIO_NUM 27
#define Y9_GPIO_NUM 35
#define Y8_GPIO_NUM 34
#define Y7_GPIO_NUM 39
#define Y6_GPIO_NUM 36
#define Y5_GPIO_NUM 21
#define Y4_GPIO_NUM 19
#define Y3_GPIO_NUM 18
#define Y2_GPIO_NUM 5
#define VSYNC_GPIO_NUM 25
#define HREF_GPIO_NUM 23
#define PCLK_GPIO_NUM 22
// ========== INMP441 I2S 腳位(ESP32-CAM 專用配置)==========
#define I2S_SCK 14 // Serial Clock(原 SD 卡 CLK)
#define I2S_WS 13 // Word Select(原 SD 卡 D3)
#define I2S_SD 15 // Serial Data(原 SD 卡 CMD)
#define I2S_PORT I2S_NUM_1 // 必須用 I2S_NUM_1(I2S_NUM_0 被攝影機佔用)
// ========== 音訊參數 ==========
#define SAMPLE_RATE 16000
#define BUFFER_LEN 1024
int32_t rawSamples[BUFFER_LEN];
int16_t samples16[BUFFER_LEN];
// ========== MJPEG 串流格式 ==========
#define PART_BOUNDARY "123456789000000000000987654321"
static const char* _STREAM_CONTENT_TYPE = "multipart/x-mixed-replace;boundary=" PART_BOUNDARY;
static const char* _STREAM_BOUNDARY = "\r\n--" PART_BOUNDARY "\r\n";
static const char* _STREAM_PART = "Content-Type: image/jpeg\r\nContent-Length: %u\r\n\r\n";
// ========== 伺服器 ==========
httpd_handle_t camera_httpd = NULL; // 網頁(埠 80)
httpd_handle_t stream_httpd = NULL; // 影像串流(埠 81)
WebSocketsServer webSocket(82); // 音訊串流(埠 82)
bool audioClientConnected = false;
// ========== 網頁 HTML ==========
static const char indexHtml[] = R"rawliteral(
<!DOCTYPE html>
<html>
<head>
<meta charset="UTF-8">
<meta name="viewport" content="width=device-width, initial-scale=1.0">
<title>ESP32-CAM 影音串流</title>
<style>
* { margin: 0; padding: 0; box-sizing: border-box; }
body {
font-family: -apple-system, BlinkMacSystemFont, "Segoe UI", sans-serif;
background: #1a1a2e;
color: #eee;
display: flex;
flex-direction: column;
align-items: center;
padding: 1rem;
}
h1 { font-size: 1.3rem; margin-bottom: 0.8rem; color: #e94560; }
.video-container {
width: 100%;
max-width: 640px;
background: #000;
border-radius: 12px;
overflow: hidden;
margin-bottom: 1rem;
}
.video-container img {
width: 100%;
display: block;
}
.controls {
display: flex;
gap: 0.8rem;
margin-bottom: 1rem;
flex-wrap: wrap;
justify-content: center;
}
.status {
font-size: 0.9rem;
color: #aaa;
margin-bottom: 1rem;
}
.status.connected { color: #4ecca3; }
.status.error { color: #e94560; }
button {
padding: 0.7rem 1.8rem;
font-size: 1rem;
border: none;
border-radius: 50px;
cursor: pointer;
transition: all 0.3s;
}
#btnAudioStart { background: #4ecca3; color: #1a1a2e; }
#btnAudioStart:hover { background: #3db890; }
#btnAudioStop { background: #e94560; color: #fff; display: none; }
#btnAudioStop:hover { background: #d63851; }
.volume-bar {
width: 100%;
max-width: 640px;
height: 16px;
background: #333;
border-radius: 8px;
overflow: hidden;
margin-bottom: 1rem;
}
.volume-fill {
height: 100%;
width: 0%;
background: linear-gradient(90deg, #4ecca3, #e94560);
transition: width 0.1s;
border-radius: 8px;
}
.info { font-size: 0.75rem; color: #555; margin-top: 1rem; }
</style>
</head>
<body>
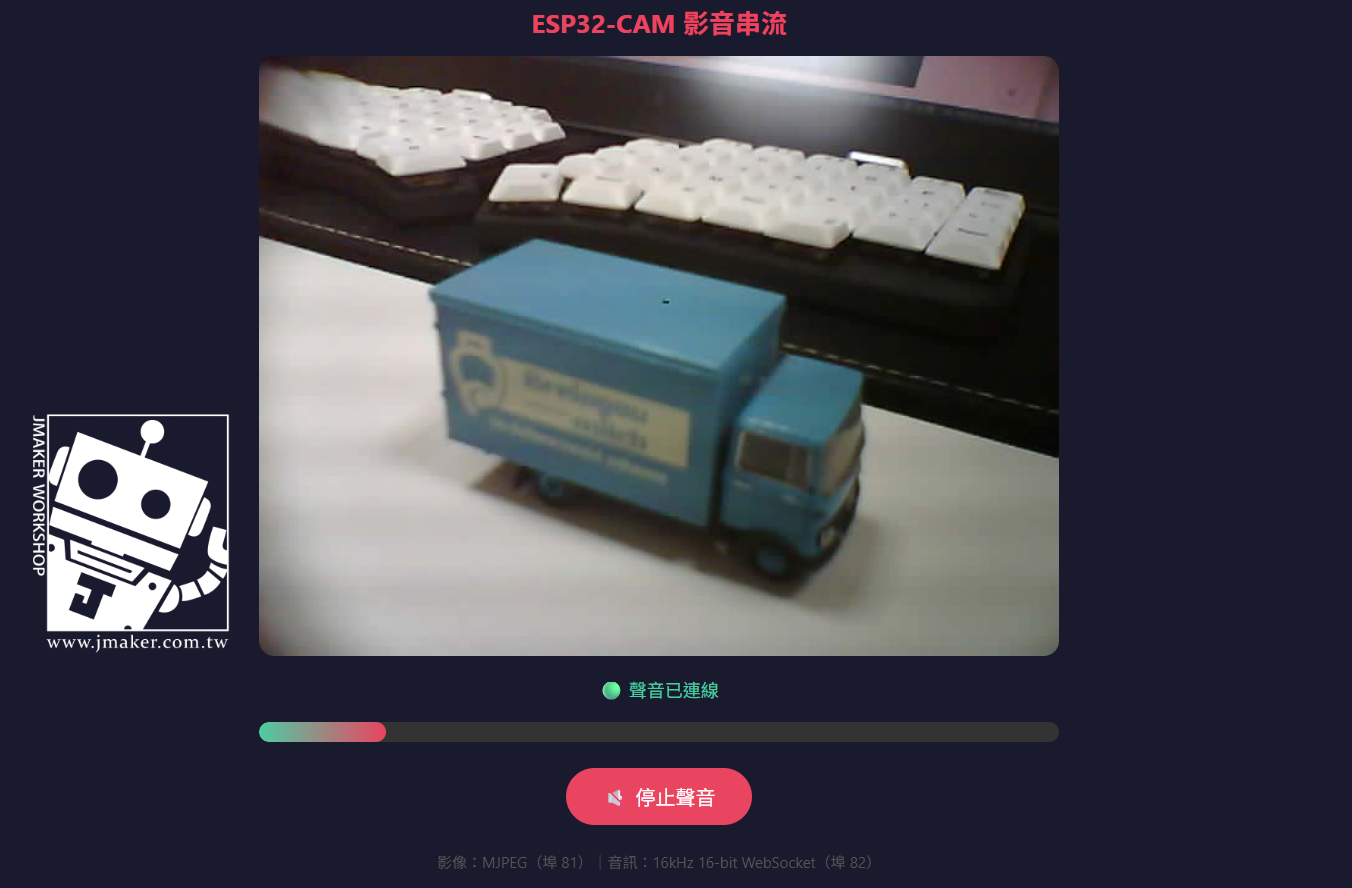
<h1>ESP32-CAM 影音串流</h1>
<div class="video-container">
<img id="stream" src="" alt="Loading...">
</div>
<div id="audioStatus" class="status">點擊按鈕開始收聽聲音</div>
<div class="volume-bar">
<div id="volumeFill" class="volume-fill"></div>
</div>
<div class="controls">
<button id="btnAudioStart" onclick="startAudio()">🔊 開始收聽</button>
<button id="btnAudioStop" onclick="stopAudio()">🔇 停止聲音</button>
</div>
<div class="info">
影像:MJPEG 串流(埠 81)| 音訊:16kHz 16-bit WebSocket(埠 82)
</div>
<script>
// 影像串流:頁面載入即開始
const host = window.location.hostname;
document.getElementById('stream').src = 'http://' + host + ':81/stream';
// 音訊串流
let ws = null;
let audioCtx = null;
let isPlaying = false;
const SAMPLE_RATE = 16000;
function startAudio() {
audioCtx = new (window.AudioContext || window.webkitAudioContext)({
sampleRate: SAMPLE_RATE
});
ws = new WebSocket('ws://' + host + ':82');
ws.binaryType = 'arraybuffer';
ws.onopen = () => {
isPlaying = true;
document.getElementById('audioStatus').textContent = '🟢 聲音已連線';
document.getElementById('audioStatus').className = 'status connected';
document.getElementById('btnAudioStart').style.display = 'none';
document.getElementById('btnAudioStop').style.display = 'inline-block';
};
ws.onmessage = (event) => {
if (!isPlaying || !audioCtx) return;
const int16Array = new Int16Array(event.data);
const numSamples = int16Array.length;
const audioBuffer = audioCtx.createBuffer(1, numSamples, SAMPLE_RATE);
const channelData = audioBuffer.getChannelData(0);
let sumSquares = 0;
for (let i = 0; i < numSamples; i++) {
channelData[i] = int16Array[i] / 32768.0;
sumSquares += channelData[i] * channelData[i];
}
const rms = Math.sqrt(sumSquares / numSamples);
document.getElementById('volumeFill').style.width = Math.min(rms * 500, 100) + '%';
const source = audioCtx.createBufferSource();
source.buffer = audioBuffer;
source.connect(audioCtx.destination);
source.start();
};
ws.onerror = () => {
document.getElementById('audioStatus').textContent = '❌ 聲音連線錯誤';
document.getElementById('audioStatus').className = 'status error';
};
ws.onclose = () => {
document.getElementById('audioStatus').textContent = '⚪ 聲音已中斷';
document.getElementById('audioStatus').className = 'status';
document.getElementById('btnAudioStart').style.display = 'inline-block';
document.getElementById('btnAudioStop').style.display = 'none';
isPlaying = false;
};
}
function stopAudio() {
isPlaying = false;
if (ws) { ws.close(); ws = null; }
if (audioCtx) { audioCtx.close(); audioCtx = null; }
document.getElementById('audioStatus').textContent = '點擊按鈕開始收聽聲音';
document.getElementById('audioStatus').className = 'status';
document.getElementById('btnAudioStart').style.display = 'inline-block';
document.getElementById('btnAudioStop').style.display = 'none';
document.getElementById('volumeFill').style.width = '0%';
}
</script>
</body>
</html>
)rawliteral";
// ========== 攝影機初始化 ==========
void cameraInit() {
camera_config_t config;
config.ledc_channel = LEDC_CHANNEL_0;
config.ledc_timer = LEDC_TIMER_0;
config.pin_d0 = Y2_GPIO_NUM;
config.pin_d1 = Y3_GPIO_NUM;
config.pin_d2 = Y4_GPIO_NUM;
config.pin_d3 = Y5_GPIO_NUM;
config.pin_d4 = Y6_GPIO_NUM;
config.pin_d5 = Y7_GPIO_NUM;
config.pin_d6 = Y8_GPIO_NUM;
config.pin_d7 = Y9_GPIO_NUM;
config.pin_xclk = XCLK_GPIO_NUM;
config.pin_pclk = PCLK_GPIO_NUM;
config.pin_vsync = VSYNC_GPIO_NUM;
config.pin_href = HREF_GPIO_NUM;
config.pin_sccb_sda = SIOD_GPIO_NUM;
config.pin_sccb_scl = SIOC_GPIO_NUM;
config.pin_pwdn = PWDN_GPIO_NUM;
config.pin_reset = RESET_GPIO_NUM;
config.xclk_freq_hz = 10000000; // 10MHz,減少畫面條紋
config.pixel_format = PIXFORMAT_JPEG;
// 有 PSRAM 可以用較高解析度
if (psramFound()) {
config.frame_size = FRAMESIZE_VGA; // 640x480
config.jpeg_quality = 12;
config.fb_count = 2;
} else {
config.frame_size = FRAMESIZE_QVGA; // 320x240
config.jpeg_quality = 15;
config.fb_count = 1;
}
esp_err_t err = esp_camera_init(&config);
if (err != ESP_OK) {
Serial.printf("攝影機初始化失敗: 0x%x\n", err);
return;
}
Serial.println("攝影機初始化完成");
}
// ========== I2S 麥克風初始化 ==========
void i2sInit() {
const i2s_config_t i2s_config = {
.mode = (i2s_mode_t)(I2S_MODE_MASTER | I2S_MODE_RX),
.sample_rate = SAMPLE_RATE,
.bits_per_sample = I2S_BITS_PER_SAMPLE_32BIT,
.channel_format = I2S_CHANNEL_FMT_ONLY_RIGHT, // 雖然 L/R 接 GND,但 I2S_NUM_1 在此腳位下聲道相反
.communication_format = I2S_COMM_FORMAT_STAND_I2S,
.intr_alloc_flags = ESP_INTR_FLAG_LEVEL1,
.dma_buf_count = 8,
.dma_buf_len = BUFFER_LEN,
.use_apll = false,
.tx_desc_auto_clear = false,
.fixed_mclk = 0
};
const i2s_pin_config_t pin_config = {
.bck_io_num = I2S_SCK,
.ws_io_num = I2S_WS,
.data_out_num = I2S_PIN_NO_CHANGE,
.data_in_num = I2S_SD
};
// 注意:必須用 I2S_NUM_1,因為 I2S_NUM_0 被攝影機佔用了
esp_err_t err = i2s_driver_install(I2S_PORT, &i2s_config, 0, NULL);
if (err != ESP_OK) {
Serial.printf("I2S 驅動安裝失敗: %d\n", err);
return;
}
err = i2s_set_pin(I2S_PORT, &pin_config);
if (err != ESP_OK) {
Serial.printf("I2S 腳位設定失敗: %d\n", err);
return;
}
Serial.println("I2S 麥克風初始化完成");
}
// ========== MJPEG 影像串流 Handler ==========
static esp_err_t stream_handler(httpd_req_t *req) {
camera_fb_t *fb = NULL;
char part_buf[64];
esp_err_t res = httpd_resp_set_type(req, _STREAM_CONTENT_TYPE);
if (res != ESP_OK) return res;
// 設定 CORS 標頭,允許跨埠存取
httpd_resp_set_hdr(req, "Access-Control-Allow-Origin", "*");
while (true) {
fb = esp_camera_fb_get();
if (!fb) { res = ESP_FAIL; break; }
size_t hlen = snprintf(part_buf, 64, _STREAM_PART, fb->len);
res = httpd_resp_send_chunk(req, _STREAM_BOUNDARY, strlen(_STREAM_BOUNDARY));
if (res == ESP_OK) res = httpd_resp_send_chunk(req, part_buf, hlen);
if (res == ESP_OK) res = httpd_resp_send_chunk(req, (const char*)fb->buf, fb->len);
esp_camera_fb_return(fb);
if (res != ESP_OK) break;
}
return res;
}
// ========== 網頁 Handler ==========
static esp_err_t index_handler(httpd_req_t *req) {
httpd_resp_set_type(req, "text/html");
return httpd_resp_send(req, indexHtml, strlen(indexHtml));
}
// ========== 啟動攝影機 HTTP 伺服器 ==========
void startCameraServer() {
// 埠 80:網頁介面
httpd_config_t config80 = HTTPD_DEFAULT_CONFIG();
config80.server_port = 80;
config80.stack_size = 8192;
httpd_uri_t index_uri = {
.uri = "/",
.method = HTTP_GET,
.handler = index_handler,
.user_ctx = NULL
};
if (httpd_start(&camera_httpd, &config80) == ESP_OK) {
httpd_register_uri_handler(camera_httpd, &index_uri);
Serial.println("HTTP 伺服器已啟動(埠 80)");
}
// 埠 81:MJPEG 影像串流
httpd_config_t config81 = HTTPD_DEFAULT_CONFIG();
config81.server_port = 81;
config81.ctrl_port += 1;
config81.stack_size = 8192;
httpd_uri_t stream_uri = {
.uri = "/stream",
.method = HTTP_GET,
.handler = stream_handler,
.user_ctx = NULL
};
if (httpd_start(&stream_httpd, &config81) == ESP_OK) {
httpd_register_uri_handler(stream_httpd, &stream_uri);
Serial.println("影像串流伺服器已啟動(埠 81)");
}
}
// ========== WebSocket 事件處理 ==========
void webSocketEvent(uint8_t num, WStype_t type, uint8_t* payload, size_t length) {
switch (type) {
case WStype_DISCONNECTED:
Serial.printf("[Audio] 客戶端 %u 已斷線\n", num);
audioClientConnected = false;
break;
case WStype_CONNECTED:
Serial.printf("[Audio] 客戶端 %u 已連線\n", num);
audioClientConnected = true;
break;
default:
break;
}
}
// ========== 音訊讀取與發送(在 Task 中執行)==========
void audioTask(void *parameter) {
while (true) {
if (!audioClientConnected) {
vTaskDelay(100 / portTICK_PERIOD_MS);
continue;
}
size_t bytesRead = 0;
esp_err_t err = i2s_read(I2S_PORT, rawSamples, sizeof(rawSamples), &bytesRead, portMAX_DELAY);
if (err != ESP_OK) continue;
int samplesRead = bytesRead / sizeof(int32_t);
for (int i = 0; i < samplesRead; i++) {
samples16[i] = (int16_t)(rawSamples[i] >> 16);
}
webSocket.broadcastBIN((uint8_t*)samples16, samplesRead * sizeof(int16_t));
}
}
// ========== setup() ==========
void setup() {
Serial.begin(115200);
Serial.println("\n=== ESP32-CAM 影音串流 ===");
// 連接 WiFi
WiFi.begin(ssid, password);
Serial.print("正在連接 WiFi");
while (WiFi.status() != WL_CONNECTED) {
delay(500);
Serial.print(".");
}
Serial.println();
Serial.print("WiFi 已連線,IP 位址:");
Serial.println(WiFi.localIP());
// ★ 關鍵:先初始化 I2S 麥克風,再初始化攝影機
// 避免 esp_camera_init() 覆蓋 I2S 相關資源
delay(500); // 等待硬體穩定
i2sInit();
// 初始化攝影機
cameraInit();
// 啟動攝影機伺服器(埠 80 + 81)
startCameraServer();
// 啟動 WebSocket 伺服器(埠 82)
webSocket.begin();
webSocket.onEvent(webSocketEvent);
Serial.println("WebSocket 音訊伺服器已啟動(埠 82)");
// 建立獨立的音訊任務(在核心 0 上執行)
// 核心 1 留給攝影機和 WiFi
xTaskCreatePinnedToCore(
audioTask, // 任務函式
"audioTask", // 名稱
4096, // Stack 大小
NULL, // 參數
1, // 優先級
NULL, // 任務 handle
0 // 在核心 0 上執行
);
Serial.println("音訊任務已建立(核心 0)");
Serial.println("\n請用瀏覽器開啟以下網址:");
Serial.print("http://");
Serial.println(WiFi.localIP());
}
// ========== loop() ==========
void loop() {
webSocket.loop();
delay(1);
}程式碼解析:跟上一篇有什麼不同?
1. I2S 設定的差異
上一篇在 NodeMCU-32S 上:
#define I2S_PORT  I2S_NUM_0
.channel_format = I2S_CHANNEL_FMT_ONLY_LEFT,
這一篇在 ESP32-CAM 上:
#define I2S_PORT  I2S_NUM_1    // 改用第二組 I2S
.channel_format = I2S_CHANNEL_FMT_ONLY_RIGHT,   // L/R 接 GND,但 I2S_NUM_1 聲道相反
有兩個差異。第一,I2S Port 必須改成 I2S_NUM_1,因為攝影機佔用了 I2S_NUM_0。第二,channel_format 要改成 ONLY_RIGHT,雖然 L/R 硬體接 GND 跟上一篇一樣,但實測發現 I2S_NUM_1 搭配 GPIO 13/14/15 這組腳位時,聲道對應是反的,用 ONLY_LEFT 會讀到空資料。
2. 用 FreeRTOS Task 分離音訊處理
上一篇把音訊讀取放在 loop() 裡,因為只有音訊一個工作。但這篇同時要處理影像串流和音訊串流,如果全放在 loop() 裡會互相卡住。
ESP32 是雙核心處理器,我們利用 xTaskCreatePinnedToCore() 把音訊處理放到核心 0,讓核心 1 專心處理攝影機和 WiFi:
xTaskCreatePinnedToCore(
  audioTask,     // 任務函式
  "audioTask",   // 名稱
  4096,          // Stack 大小
  NULL,          // 參數
  1,             // 優先級
  NULL,          // 任務 handle
  0              // 核心 0
);
3. 三個伺服器各司其職
| 埠 | 伺服器 | 功能 |
|---|---|---|
| 80 | HTTP | 網頁介面(HTML + JavaScript) |
| 81 | HTTP | MJPEG 影像串流 |
| 82 | WebSocket | 音訊二進位串流 |
網頁載入後,影像透過 <img> 標籤的 MJPEG 串流自動顯示,音訊則需要使用者點擊「開始收聽」按鈕後才啟動(瀏覽器的安全限制)。
Arduino IDE 設定
| 設定項目 | 選擇 |
|---|---|
| Board | AI Thinker ESP32-CAM |
| Partition Scheme | Huge APP (3MB No OTA/1MB SPIFFS) |
| Upload Speed | 115200 |
| Port | 你的 COM Port |
上傳方式
因為要使用 FTDI,請參考之前的 ESP32-CAM 教學中的接線和上傳步驟。
測試
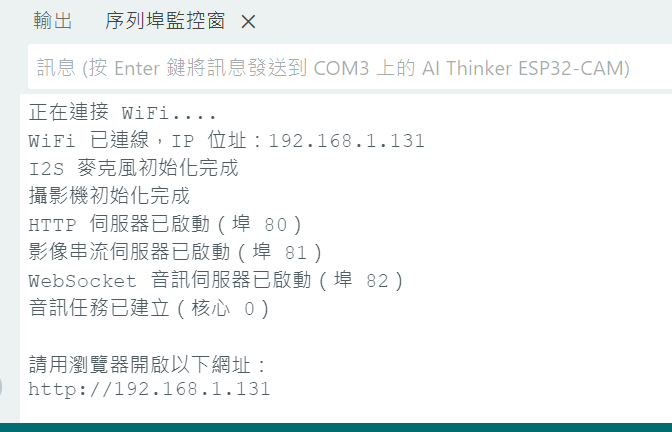
- 上傳程式碼後,開啟 Serial Monitor(鮑率 115200)
- 按下 ESP32-CAM 的 Reset 按鈕
- 等待 WiFi 連線,記下顯示的 IP 位址
- 用瀏覽器開啟該 IP(例如
http://192.168.1.100) - 畫面應該立即顯示即時影像
- 點擊「🔊 開始收聽」按鈕,開始接收聲音
- 對著 INMP441 說話,確認能從電腦喇叭聽到

常見問題排解
影像正常但沒有聲音
確認 INMP441 的接線,特別是 SD 線(GPIO 15)和 SCK 線(GPIO 14)。確認 L/R 腳有接到 GND。如果聽到的全是雜訊,試著將程式中的 I2S_CHANNEL_FMT_ONLY_LEFT 改成 I2S_CHANNEL_FMT_ONLY_RIGHT,並將 L/R 改接 3.3V。
影像和聲音有延遲
影音之間有些許延遲是正常的,因為 MJPEG 和 WebSocket 走的是不同的通道,瀏覽器接收和緩衝的時間不一致。如果延遲太大,可以嘗試降低影像解析度(改成 FRAMESIZE_QVGA)來減輕 ESP32 的負擔。
ESP32-CAM 反覆重啟
供電不足是最常見的原因。ESP32-CAM 同時跑攝影機、WiFi 和 I2S 麥克風時,電流需求較大,建議使用 5V/2A 以上的穩定電源,不要只靠電腦 USB 供電。
上傳程式失敗
確認 INMP441 的接線沒有影響到 ESP32-CAM 的 Strapping pin(GPIO 0、2、12、15)。本篇選用的 GPIO 13、14、15 中,GPIO 15 是 Strapping pin,但通常不會影響上傳。如果仍然失敗,可以先把 INMP441 整組拔掉再上傳,完成後再接回。
延伸應用
- 居家監控:搭配 PIR 人體感測器,偵測到人時自動開始錄影錄音
- 嬰兒監視器:加上音量閾值偵測,寶寶哭了就透過 LINE Notify 推播通知
- 門禁對講機:搭配 MAX98357A 擴大器和喇叭,實現雙向語音通話
- go2rtc 整合:用 go2rtc 串流應用將 MJPEG + WAV 轉碼合併,可大幅降低延遲
- Home Assistant:將影音串流整合到智慧家庭儀表板
結語
這篇教學最大的挑戰不是程式碼本身,而是 ESP32-CAM 嚴重不足的 GPIO 資源。理解「為什麼不能直接沿用 NodeMCU-32S 的腳位」,以及「如何在有限的腳位中找出可用的組合」,是從單一模組專案走向多模組整合的必經過程。
如果你覺得 ESP32-CAM 的腳位限制太大,可以考慮改用 ESP32-S3 系列的開發板(例如 Freenove ESP32-S3 Cam 或 XIAO ESP32S3 Sense),它們有更多可用的 GPIO,有些甚至內建 PDM 麥克風,不需要額外接 INMP441。
本文由傑森創工(blog.jmaker.com.tw)製作,歡迎分享轉載,請註明出處。